Have you played with our Peppered Cottons?
They are fun, versatile fabrics that come in a large range of colors!
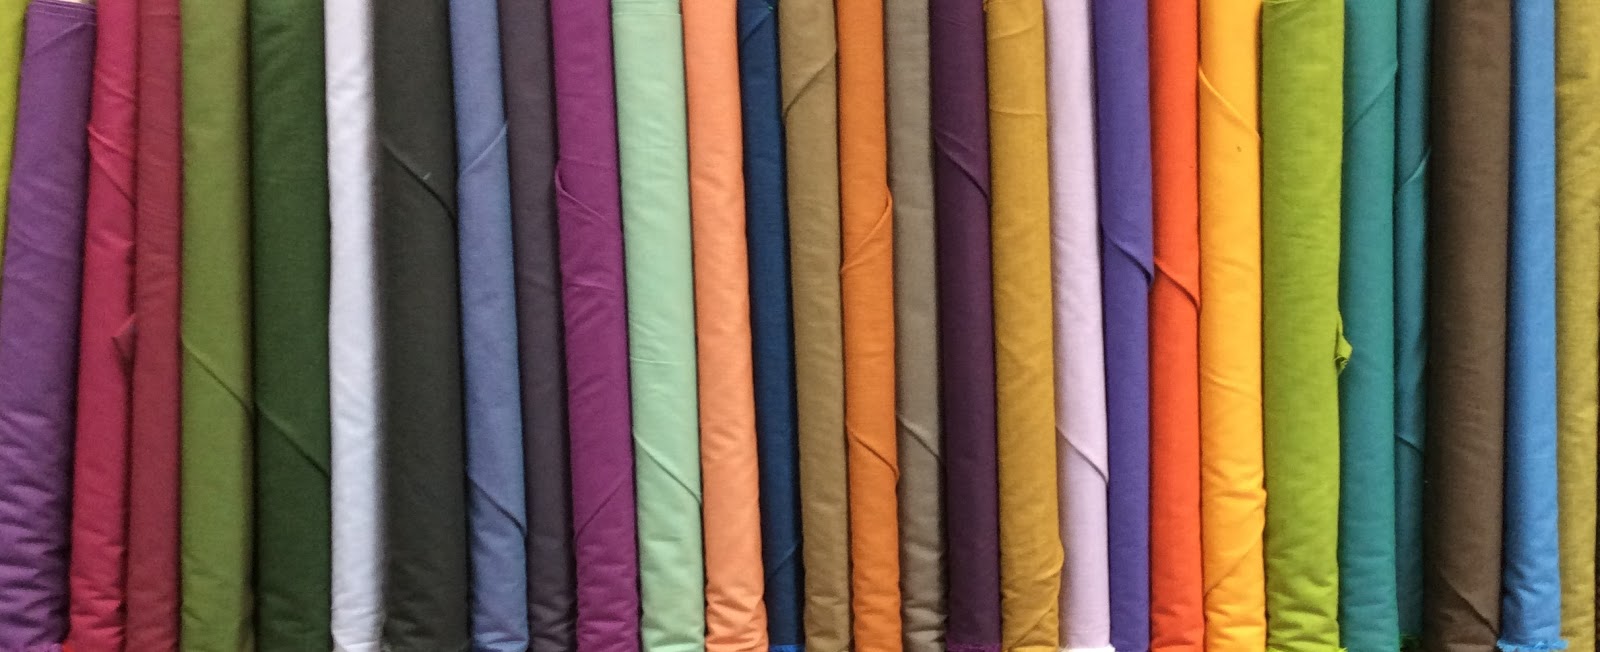
We love using them to make table napkins.
Fray the edges and add a decorative stitch and you're good to go! They come in fun stripes too!

 |
Here are some tips and tricks from the designer Pepper Cory:
How to Work with Peppered Cottons By Pepper Cory (July 2013)
What Peppered
Cottons are. Peppered Cottons are 100% shot cotton fabrics that almost
fall into the solid color category. The term ‘shot’ means that the weft is
“shot through” the warp, but uses a discernibly different color thread. Because
the warp (lengthwise threads) and the weft (side to side threads) are different
colors, the resulting shades are muted and variable combinations of the
original colors. For instance, a black warp thread plus a blue weft thread
woven together makes for a very dark blue such as Ink color# 45. When a fabric
like Ink is viewed from different angles, the blues and blacks produce subtly
different visual effects. Above all, shot cottons have a tactile hand-woven quality
and display deep colors well since all threads are dyed prior to weaving. There
is no wrong or right side to shot cottons--a plus for quilt-makers.
Peppered Cottons
on the bolt. All shot cottons, after being woven, go through a
finishing process where they are washed, dried and calendared. Calendaring is a
heat-plus-pressing process which imparts a subtle sheen and a soft hand to the
cotton fabric. The final step for the finished goods is to go through a double
and rolling machine where the fabric is folded and wound tightly on to bolts. Calendaring
disappears after washing. Art quilters, who do not need to wash their fabrics,
can use shot cottons straight from the bolt, but most quilt-makers will want to
wash the fabric prior to starting a quilt project.
How to Wash.
Keeping the fabric in its double and rolled form, slightly trim a little angled
‘ear’ from both selvedge edges of the length of fabric. Unfold the fabric. If
washing small pieces of the fabric, put the shot cotton pieces into a lingerie
bag or knotted pillow case (give the fabric room to move— not a tight knot). My
preference is to wash in warm water and rinse in cold. Use the same sort of soap
or detergent you would use to eventually clean a quilt. If washing multiple
pieces, sort into several bags by color. Wash in a full tub of water and use a
Color Catcher ™ in the load. FYI: this step is to capture any excess dye
particles. Peppered Cottons are color-fast! After washing, take the fabrics out
of the bags and ‘fluff.’ Cut any loose threads at that time. Re-insert the damp
pieces loosely into their bags and dry about 20 minutes. Do not walk away and
let the fabrics over-dry. Unfold the pieces and air-dry completely. If the
pieces are small, you may iron them at this time. Most of the time, I snip any
loose threads, fold the dry shot cottons yardage and store on shelves. Then
when I’m ready to sew with the shot cottons, I only iron as much as I need of
the fabric for that specific project.
Washed Peppered
Cottons. Washed and pressed Peppered Cottons have a slightly different
hand than when they are on the bolt. The calendaring sheen rinses out and the
weave firms up, giving the fabrics the hand (texture + weight) of good-quality
unbleached muslin. The brilliant colors also slightly intensify when the
light-reflective finish is gone. Because of the difference in finishing between
on-the-bolt and washed Peppered Cottons, the best advice is to purchase all you
will need for a project at one time and to treat that entire length of fabric
in the same manner. In other words, no un-washed and washed Peppered Cotton
colors should be mixed in the same project. Note that Peppered Cottons are a
higher thread weight than most shot cottons which means that they blend well with
regular-weight quilting fabrics. You can mix-and-match Peppered Cottons with
fabrics from your stash with the assurance that they will stand up to use.
Sewing With
Peppered Cottons. Before cutting patchwork pieces from the fabric, give
it a light mist of spray starch and press. This step gives the fabric even more
body. Align selvedges, especially if cutting with the grain, and cut pieces as
usual. When sewing, use a good quality #50 or #60 100% cotton sewing thread and
use your normal stitch length. Either match the color of thread to the fabric or
choose a shade that will blend in well with your project like taupe, grey or
khaki.
Appliqué Tips. I like to spray-starch shot cotton yardage
twice (spray both sides) when doing appliqué. Since appliqué requires a lot of
handling, a little extra body never hurts, especially when doing needle-turn
appliqué by hand. When performing sewing machine appliqué, sample a block first
so you can adjust stitch type, length of stitch and your preferred weight of
thread. In most cases, either #50 or #60 weight thread is a good choice for
machine appliqué work.
Pressing.
Always use a clean iron. I prefer a lightweight nonstick-coated iron and I
seldom use steam. When ironing shot cotton yardage and sewn patchwork, set your
iron on Wool, the setting just below Cotton. A too-hot iron can cause crinkling
at the edges of the cut patchwork. There is no need to work at any hotter
setting than Wool.
Quilting.
When machine-quilting, use a new needle and again, a thin strong thread. I like
a flat look in my quilts so prefer a thin cotton or wool batting--almost the
flatness of flannel. For quilt backing, choose a quilting-weight cotton fabric,
rather than more shot cottons, to give more density to the quilt.
Working With a
Professional Quilter. If you hire a professional quilter, be willing to
work with him/her in the event that he/she has had no experience with shot
cottons. Tip: take the quilter a sandwiched block (top, batting, backing),
using the same shot cottons used in your quilt top. This sample is so he/she
can test his/her stitches. Make the bottom layer (backing) of the quilt
sandwich using a regular weight cotton. Shot cottons are easy to quilt, but
sometimes a professional quilter uses the same size needle for all tasks. FYI:
you can tell when too large of a needle has been used in machine quilting--when
the finished quilt is held to the light, tiny pin-holes appear and light shines
through them. Hopefully, these miniscule holes close up after use and washing.
To be sure, when quilting a shot cotton quilt, ask that your quilter use a new,
slightly thinner needle and thinner thread
for the best combination. You should plan on using a
non-shot cotton quilt backing fabric. Work together with the quilter so you can
achieve the finest final product.
Quilting by Hand.
When quilting by hand on shot cottons, I like to use a good quality thread. Thoroughly
baste the three layers so they do not shift while working. The usual weight of
hand quilting thread is #40. Since quilting stitches show so well on the
surface of Peppered Cottons, this is a great opportunity to experiment with
contrasting colors of thread. Or another option would be to try Big Stitch
quilting using a #8 or #12 perle cotton.
Finishing and
Binding. After quilting, but before binding, run basting stitches
completely around all sides of the
quilt, especially if there are any cut bias edges that might stretch. Stitch in
from the open cut edges of the quilt 1/8th inch. Basting can be done by either
machine or hand. Leave basting stitches in place. After basting (which “closes
up” the sandwich of top/batting/backing), decide if you want to trim the quilt
exactly to its cut edges or leave a little batting/backing to plump up the
binding. Cut binding either with the straight of grain or on the bias. If using
shot cottons for the binding and cutting bias, another light spray of starch
will help you handle the stretchy bias strips better. We hope you enjoy working
with Peppered Cottons and find them a great addition to your quilting palette!
Keep your eye out for more new colors coming soon.
From Pepper Cory and all the folks at Studio e Fabrics